이 링크를 통해 구매하시면 제가 수익을 받을 수 있어요. 🤗
https://inf.run/CEPP1
실전에서 바로 써먹는 Kafka 입문| JSCODE 박재성 - 인프런 강의
현재 평점 5.0점 수강생 298명인 강의를 만나보세요. 비전공자 입장에서도 쉽게 이해할 수 있고, 실전에서 바로 적용 가능한 'Kafka 입문' 강의를 만들어봤습니다! Kafka 핵심 개념, Spring Boot에서의 Kaf
www.inflearn.com
- 대규모 트래픽에서 동기 호출의 한계: 이메일 발송, 포인트 적립, 로그 저장이 다 얽히면 느려지고 장애가 전파됨.
- Kafka를 실습하며 배운 점: 이벤트 기반으로 분리해두면 응답 속도, 확장성, 장애 격리가 가능하다.
- 실제 대규모 서비스(배달앱, 쇼핑몰)에서 Kafka가 쓰이는 이유를 작은 회원가입 기능을 통해 이해하고 싶었다.
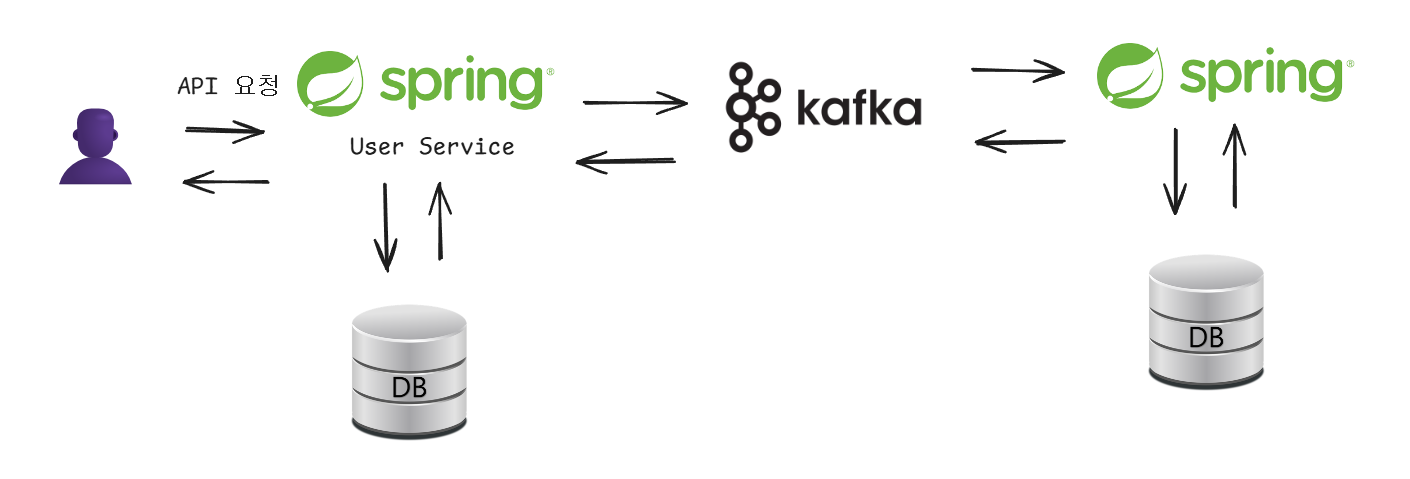
✅ 환경 세팅
- Kafka 3대 브로커 구성 + 토픽 생성 명령어 (지금 작성한 것처럼)
- application.yml 설정
- 그림: UserService ↔ Kafka Cluster ↔ EmailService
✅ 회원 가입 비즈니스 로직 짜기
1. 회원 가입한 사용자 정보 DB에 저장하기,
Json 형태의 String으로 만들어 주는 함수 추가하기,
Kafka에 메시지 보내는 로직 추가하기
UserService
@Service
public class UserService {
  private final UserRepository userRepository;
  private final KafkaTemplate<String, String> kafkaTemplate;

  public UserService(UserRepository userRepository, KafkaTemplate<String, String> kafkaTemplate) {
    this.userRepository = userRepository;
    this.kafkaTemplate = kafkaTemplate;
  }

  public void signUp(SignUpRequestDto signUpRequestDto) {
    // 회원 가입한 사용자 정보 DB에 저장
    User user = new User(
        signUpRequestDto.getEmail(),
        signUpRequestDto.getName(),
        signUpRequestDto.getPassword()
    );
    User savedUser = userRepository.save(user);

    // 카프카에 메시지 전송
    UserSignedUpEvent userSignedUpEvent = new UserSignedUpEvent(
        savedUser.getId(),
        savedUser.getEmail(),
        savedUser.getName()
    );
    this.kafkaTemplate.send("user.signed-up", toJsonString(userSignedUpEvent));
  }

  private String toJsonString(Object object) {
    ObjectMapper objectMapper = new ObjectMapper();
    try {
      String message = objectMapper.writeValueAsString(object);
      return message;
    } catch (JsonProcessingException e) {
      throw new RuntimeException("Json 직렬화 실패");
    }
  }
}
2. Kafka에 전송할 메시지 객체 만들기
public class UserSignedUpEvent {
  private Long userId;
  private String email;
  private String name;

  public UserSignedUpEvent(Long userId, String email, String name) {
    this.userId = userId;
    this.email = email;
    this.name = name;
  }

  public Long getUserId() {
    return userId;
  }

  public String getEmail() {
    return email;
  }

  public String getName() {
    return name;
  }
}
✅ 이메일 발송을 처리할 Consumer 로직 짜기
- Kafka의 메시지를 가져와 담을 객체 만들기
UserSignedUpEvent
public class UserSignedUpEvent {
  private Long userId;
  private String email;
  private String name;

  // 역직렬화(String 형태의 카프카 메시지 -> Java 객체)시 필요함
  public UserSignedUpEvent() {
  }

  public UserSignedUpEvent(Long userId, String email, String name) {
    this.userId = userId;
    this.email = email;
    this.name = name;
  }

  public static UserSignedUpEvent fromJson(String json) {
    try {
      ObjectMapper objectMapper = new ObjectMapper();
      return objectMapper.readValue(json, UserSignedUpEvent.class);
    } catch (JsonProcessingException e) {
      throw new RuntimeException("JSON 파싱 실패");
    }
  }

  public Long getUserId() {
    return userId;
  }

  public String getEmail() {
    return email;
  }

  public String getName() {
    return name;
  }
}
2. Consumer 로직 작성하기
UserSignedUpEventConsumer
@Service
public class UserSignedUpEventConsumer {

	@KafkaListener(
      topics = "user.signed-up",
      groupId = "email-service",
      concurrency = "3"
  )
  @RetryableTopic(
      attempts = "5",
      backoff = @Backoff(delay = 1000, multiplier = 2),
      dltTopicSuffix = ".dlt"
  )
  public void consume(String message) throws InterruptedException {
    UserSignedUpEvent userSignedUpEvent = UserSignedUpEvent.fromJson(message);

    // 실제 이메일 발송 로직은 생략
    String receiverEmail = userSignedUpEvent.getEmail();
    String subject = userSignedUpEvent.getName() + "님, 회원 가입을 축하드립니다!";
    Thread.sleep(3000); // 이메일 발송에 3초 정도 시간이 걸리는 걸 가정
    System.out.println("이메일 발송 완료");
  }
}
위 로직에서 추가로 이메일 발송 로그를 DB에 저장하는 로직을 추가해야 한다.
3. 이메일 발송 로그를 남기기 위한 엔티티, 레포지토리 생성하기
EmailLog
@Entity
@Table(name = "email_logs")
public class EmailLog {
  @Id
  @GeneratedValue(strategy = GenerationType.IDENTITY)
  private Long id;

  private Long receiverUserId;

  private String receiverEmail;

  private String subject;

  public EmailLog() {
  }

  public EmailLog(Long receiverUserId, String receiverEmail, String subject) {
    this.receiverUserId = receiverUserId;
    this.receiverEmail = receiverEmail;
    this.subject = subject;
  }

  // getter 메서드
}
4. Consumer 로직 보완하기
이메일 발송 로그를 DB에 저장하는 로직을 추가하자.
UserSignedUpEventConsumer
@Service
public class UserSignedUpEventConsumer {

  private EmailLogRepository emailLogRepository;

  public UserSignedUpEventConsumer(EmailLogRepository emailLogRepository) {
    this.emailLogRepository = emailLogRepository;
  }

  @KafkaListener(
      topics = "user.signed-up",
      groupId = "email-service",
      concurrency = "3"
  )
  @RetryableTopic(
      attempts = "5",
      backoff = @Backoff(delay = 1000, multiplier = 2),
      dltTopicSuffix = ".dlt"
  )
  public void consume(String message) throws InterruptedException {
    UserSignedUpEvent userSignedUpEvent = UserSignedUpEvent.fromJson(message);

    String receiverEmail = userSignedUpEvent.getEmail();
    String subject = userSignedUpEvent.getName() + "님, 회원 가입을 축하드립니다!";
    Thread.sleep(3000);
    System.out.println("이메일 발송 완료");

    EmailLog emailLog = new EmailLog(
        userSignedUpEvent.getUserId(),
        receiverEmail,
        subject
    );

    emailLogRepository.save(emailLog);
  }
}
5. DLT로 빠지는 메시지 처리하는 로직 추가하기
UserSignedUpEventDltConsumer
@Service
public class UserSignedUpEventDltConsumer {
  @KafkaListener(
      topics = "user.signed-up.dlt",
      groupId = "email-service"
  )
  public void consume(String message) {
    // 실제 로직은 생략
    System.out.println("로그 시스템에 전송 : " + message);
    System.out.println("Slack에 알림 발송");
  }
}
✅ 환경 세팅
1. Kafka 클러스터 3대 구성 (브로커 다중화 -> 안정성 확보)
- 기존에 생성되어 있던 토픽 삭제하기
# 전체 토픽 조회
$ bin/kafka-topics.sh \
	--bootstrap-server localhost:9092 \
	--list

# 조회된 모든 토픽 삭제하기
$ bin/kafka-topics.sh \
	--bootstrap-server localhost:9092 \
	--delete --topic <토픽명>
- 토픽 생성하기
$ bin/kafka-topics.sh \
	--bootstrap-server localhost:9092 \
	--create \
	--topic user.signed-up \
	--partitions 3 \
	--replication-factor 3


# 토픽 세부 정보 조회 (잘 생성됐는 지 확인하기)
$ bin/kafka-topics.sh \
  --bootstrap-server localhost:9092 \
  --describe \
  --topic user.signed-up
- DLT 토픽 생성하기
$ bin/kafka-topics.sh \
	--bootstrap-server localhost:9092 \
	--create \
	--topic user.signed-up.dlt \
	--partitions 1 \
	--replication-factor 3

# 토픽 세부 정보 조회 (잘 생성됐는 지 확인하기)
$ bin/kafka-topics.sh \
  --bootstrap-server localhost:9092 \
  --describe \
  --topic user.signed-up.dlt
✅ 잘 작동하는 지 테스트해보기
- User Service, Email Service 서버 실행하기
- API 요청 보내보기
{
    "email": "jscode@naver.com",
    "name": "박재성",
    "password": "1234"
}
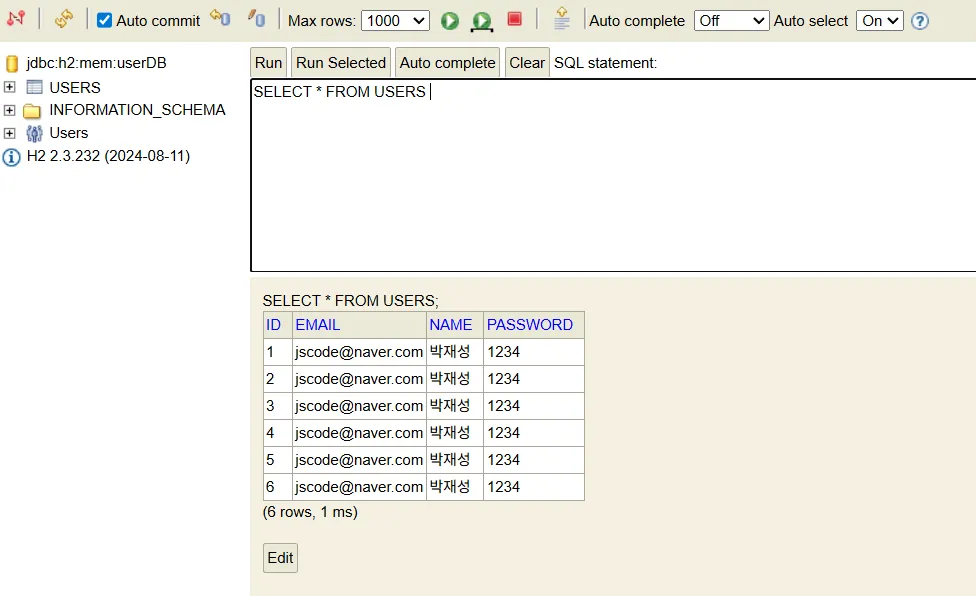
3. DB 조회해보기
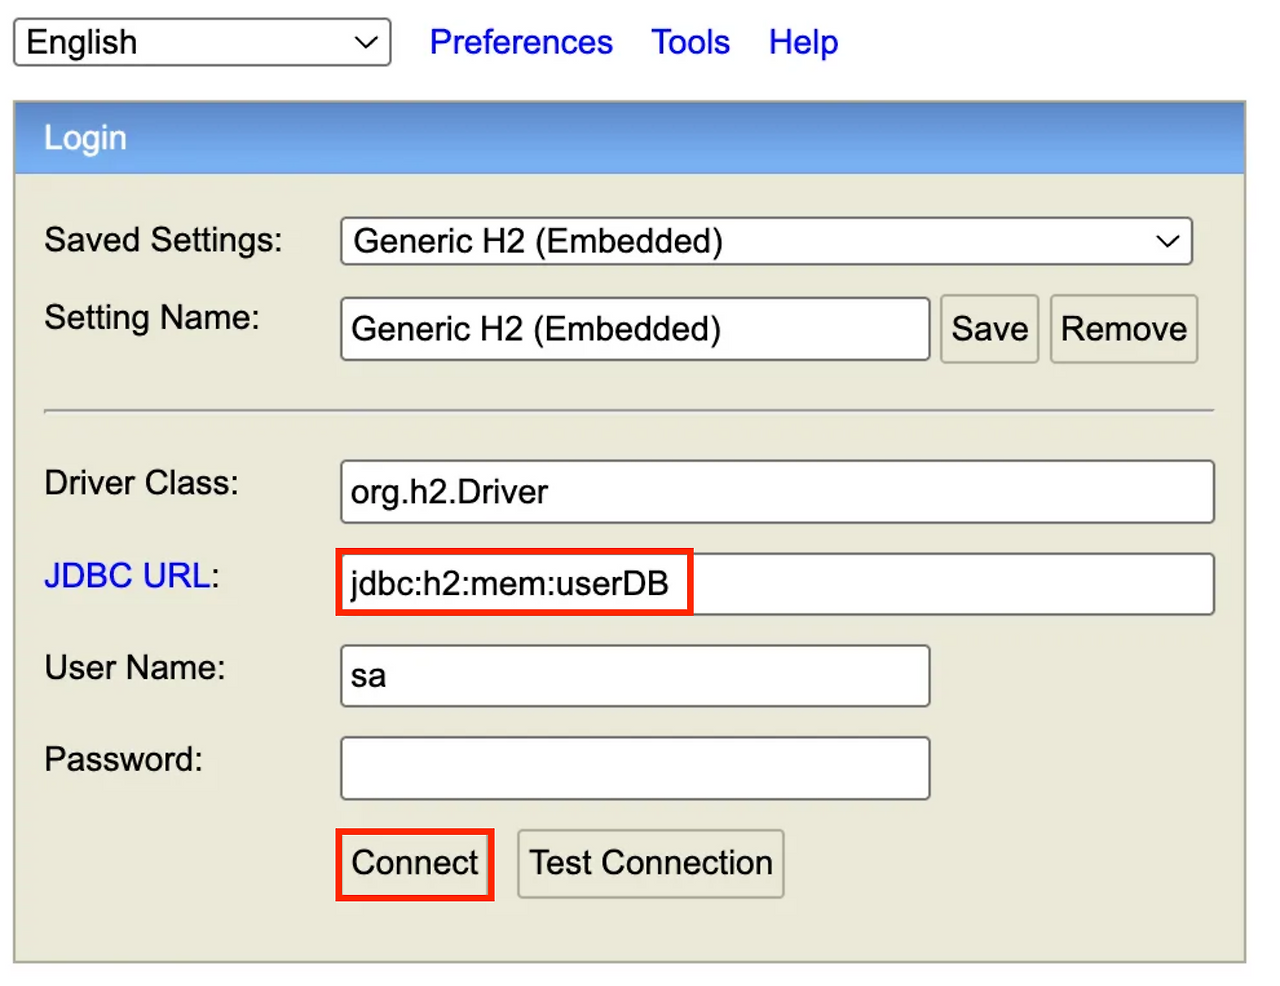
localhost:8080/h2-console로 접근해 확인하기
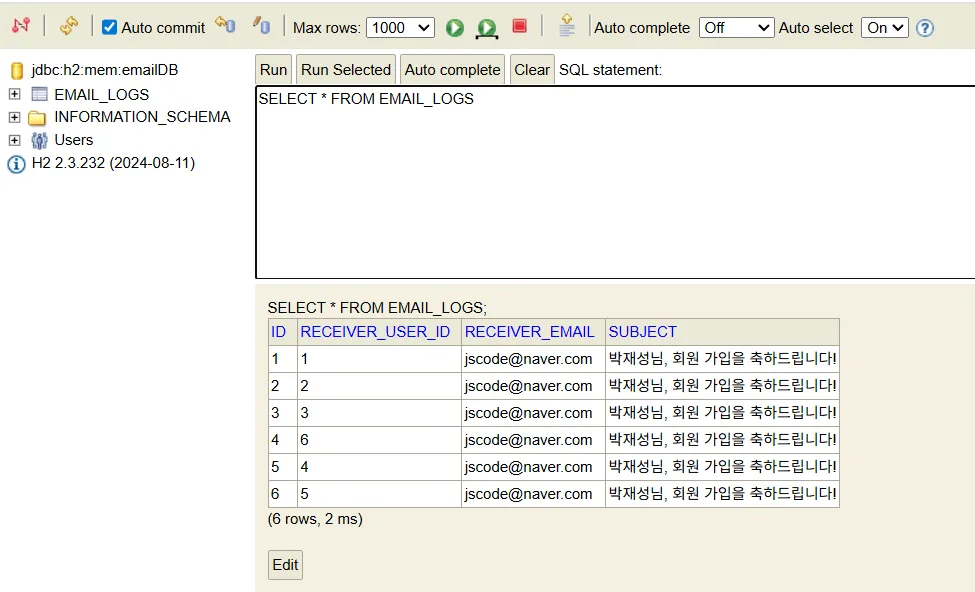
localhost:8081/h2-console로 접근해 확인하기
✅ 느낀 점
Kafka 클러스터 세팅은 쉽지 않았지만, 실제 서비스가 안정적으로 동작하는 이유를 조금은 이해할 수 있었다.
'Kafka' 카테고리의 다른 글
| Apache Kafka 공식 문서 보면서 핵심 기능 정리 (0) | 2025.11.10 |
|---|---|
| 카프카(Kafka) 로컬 환경 구축과 기본 개념 정리 (0) | 2025.09.05 |
| Kafka 시작하기 (0) | 2025.08.31 |